


Ensure the SharePoint services running
While working with caml query there may be cases where we may need to refer internal name of a sharepoint list and in some of the cases the display name and internal name may be different. If you try to access this list we will get object not found error.
We can find out the sharepoint field’s internal name using any of the following ways
1. Using browser (it applies to custom fields only)
Go to list settings -> Edit column. Then you can see field name from the query string
2. Object model (it applies for custom fields as well as system fields)
string siteUrl = "http://mysite";
SPSite site = new SPSite(siteUrl);
SPWeb web = site.OpenWeb();
SPList list = web.Lists["my forum"];
for (int i = 0; i < list.Fields.Count; i++)
Console.WriteLine(list.Fields[i].Title + "..." + list.Fields[i].InternalName + "...");
Console.ReadLine();
3. Powershell (it applies for custom fields as well as system fields)
[system.reflection.assembly]::loadwithpartialname("microsoft.sharepoint")
$site= New-Object Microsoft.SharePoint.SPSite ("http://mysite")
$web=$site.OpenWeb()
$list=$web.Lists["my forum"]
$list.Fields |select title, internalname| more
In this post we will see 3 different methods for adding columns in SharePoint list or document library or discussion board.
using browser
Go to the list which you want to add column
On the page that displays the list, click list’s settings and create columns.
Type a name for the column, choose the column type and click OK.
using Object model
SPSite site = new SPSite(siteUrl);
SPWeb web = site.OpenWeb();

site.AllowUnsafeUpdates = true;
web.AllowUnsafeUpdates = true;

SPList list = web.Lists["mylist"];
SPFieldText fldName = (SPFieldText)list.Fields.CreateNewField(SPFieldType.Text.ToString(), "mycolumn");
fldName.Required = true;
fldName.MaxLength = 50;
list.Fields.Add(fldName);
list.Update();

site.AllowUnsafeUpdates = false;
web.AllowUnsafeUpdates = false;
using PowerShell
[system.reflection.assembly]::loadwithpartialname("microsoft.sharepoint")
$site= New-Object Microsoft.SharePoint.SPSite ("http://mysite")
$web=$site.OpenWeb()
$list=$web.Lists["mylist"]
$list.Fields.Add("mycolumn", "Text", 0)
In this article we will see how to Change the row Background color based on the value of a column in a sharepoint list and we will be doing it using jQuery.
Below is a screenshot of a Task Tracker whose rows are highlighted based on the percentage complete.

Here is how you can do it.
1. Create Sharepoint list
2. Edit allitems.aspx page and add a content editor web part and copy the below jQuery code to that webpart.
<script type="text/javascript">
$(document).ready(function(){
$Text = $("td .ms-vb2:contains('Not Started')");
$Text.parent().css("background-color", "#461B7E");
var myelement = $Text.parent().parent();
$Text = $("td .ms-vb2:contains('Completed')");
$Text.parent().css("background-color", "#4CC417");
$Text = $("td .ms-vb2:contains('In Progress')");
$Text.parent().css("background-color", "#EAC117");
});
</script>
In this article we will see how to highlight list a row on mouse over using jQuery.

Lets get started
1. Create a Sharepoint list
2. Edit allitems.aspx page and add a content editor web part and copy the below jquery and mouser over style to that webpart.
<script type="text/javascript">
$(document).ready(function()
{
$('td.ms-vb2').hover(function() {
$(this).parent().addClass("highlight");
// On mouseout, remove classes
}, function() {
$(this).parent().removeClass("highlight");
});

}); </script>
<style>
.highlight {background-color:#9AFEFF}
</style>
SharePoint does not allow creating two columns with the same name. If you still try to create more than 1 column with the same name then you will be prompted with an error message.
“The column name that you are entered is already use or reserved. Choose another name.”
But in many cases we may need two columns with same label. In this post we can see a work around for creating two labels with same text. Below is what we are going to achieve.

<script type="text/javascript">// <![CDATA[
var tables;
tables = document.getElementById('ctl00_m_g_a3ac2436_2405_4e04_8afd_fa6f84b65d1b_ctl00_ctl04_ctl08_ctl00_ctl00_ctl04_ctl00_ctl00_TextField').parentNode.parentNode.parentNode.parentNode.parentNode;
var i;
var str;
for(i=0;i
<tables.rows.length;i++)  {  str = tables.rows[i].cells[0].innerHTML;  if(str.indexOf('#') > 1)
tables.rows[i].cells[0].innerHTML =str.replace("#", "");
}
}
// ]]></script>
Note: In the above code ctl00_m_g_a3ac2436_2405_4e04_8afd_fa6f84b65d1b_ctl00_ctl04_ctl08_ctl00_ctl00_ctl04_ctl00_ctl00_TextField is the ID one of the column in that list, for identifying parent table. (You can get it by viewing the Source code of the page).
There may be cases when we need to a hide required field while adding a new item to a list but at the same time you may want to show it while editing the item.
The above case looks tricky but it is easily achievable using some extra bit of code or PowerShell
C#
string siteUrl = "http://mysite";
SPSite site = new SPSite(siteUrl);
SPWeb web = site.OpenWeb();
site.AllowUnsafeUpdates = true;
web.AllowUnsafeUpdates = true;
SPList list = web.Lists["mylist"];
SPField fldName = list.Fields["Name"];
fldName.ShowInNewForm = false;
fldName.Update();
list.Update();
PowerShell
[system.reflection.assembly]::loadwithpartialname("microsoft.sharepoint")
$site= New-Object Microsoft.SharePoint.SPSite ("http://d-dev1:1234/gp")
$web=$site.OpenWeb()
$list=$web.Lists["mylist"]
$field = $list.Fields["Name"]
$field.ShowInNewForm = $false
$field.Update()
If you want to hide this field in edit form, you can use below command
fldName.ShowInEditForm = false;
If you want to hide this field in display form, you can use below command
fldName.ShowInDisplayForm = false;
If you want to hide this field in list settings, you can use below command
fldName.ShowInListSettings = false;
If it is not a required filed then you can hide the item using Jquery in client side.
<script type="text/javascript">// <![CDATA[
$(document).ready(function() {
$('nobr:contains("Name")').closest('tr').hide();
});
// ]]></script>
In this article we will see how we can to get data from a content editor webpart from one page and display it in another page using a custom webpart.
SPSite site = new SPSite("http://mysite">http://mysite"); // create object of the site
SPWeb web;
Microsoft.SharePoint.WebPartPages.SPLimitedWebPartManager mgr = null;
web = site.OpenWeb();
mgr = web.GetLimitedWebPartManager("Pages/mypage.aspx", System.Web.UI.WebControls.WebParts.PersonalizationScope.User);//http://mysite/Pages/mypage.aspx will be the URL of the source page
foreach (System.Web.UI.WebControls.WebParts.WebPart wp in mgr.WebParts)
{
if (wp.Title ==  "My RichTextEditor") //My RichTextEditor is the webpart title
{
SPWebPartPages.ContentEditorWebPart webPart =    (SPWebPartPages.ContentEditorWebPart)wp;
output.Write(webPart.Content.InnerText);
}
}
In this article we will see how to validate the values entered by the user in custom property of web part.
In last blog post we added a text box in tool part pane of web part. In the below code we are trying to validate whether the text, enter by the user, is more than 10 characters.
public string text;
[Category("Advanced Settings"),
Personalizable(PersonalizationScope.Shared),
WebBrowsable, WebDisplayName("Text"),
WebDescription("Enter your text")]
public string Text
{
get { return text; }
set {
// Validate input
if(value.Length < 10)
throw new WebPartPageUserException("Enter minimum 10 charectors in text field.");
text = value;
}
}
As you can see in the above code, you can write your own conditions in the set method of the property of the control and throw WebPartPageUserException if error an occurs or if it is an invalid entry.
In coming articles we will see how to deploy custom web part in master page
Displaying a webpart (your own custom made or any of the OOTB ones) in the master page of your site might not be directly supported by the GUI, but requires minimal effort and no coding.
The easiest way is to add the web part to a normal page (not within a zone), open this page in Sharepoint Designer and steal the generated code. This code can then be inserted into the masterpage where you want it displayed, and then finally add the tag prefix in the header of the masterpage to reference the webpart assembly.
Here's an example:
The following code is the generated markup for my SubSiteTitleWebPart.
1 | <WpNs0:SubSiteTitleWebPart runat="server" ID="g_d2f29a1f_146b_450e_aec1_81a20e6a9646" Description="My WebPart" Title="SubSiteTitleWebPart" __MarkupType="vsattributemarkup" __WebPartId="{A44A399D-8D5B-419B-B5E2-71BD0B35EC67}" WebPart="true" __designer:IsClosed="false"></WpNs0:SubSiteTitleWebPart> |
Take note of the "WpNso" prefix, this is the one that references to the webpart assembly. You will find the reference at the top of the page, looking a little something like this:
1 | <%@ Register TagPrefix="WpNs0" Namespace="SubsiteTitleBar.SubSiteTitleWebPart" Assembly="SubsiteTitleBar, Version=1.0.0.0, Culture=neutral, PublicKeyToken=3f987c92d971a0fb"> |
Just copy the same tag prefix to the masterpage and you're done!
In this blog post we will see how to add custom properties for SharePoint web part. There are several properties available in SharePoint web part for setting its look and feel like Title, Height and Width etc.. In this example we will see how to add Dropdown, Check box and a Text box in webPart tool pane.

[DefaultProperty("Text"), ToolboxData("<{0}:WPwithBGcolr runat=server></{0}:DisplayLatestPosts"), XmlRoot(Namespace = "WPwithBGcolr")]public string text;
[Category("Advanced Settings"),
Personalizable(PersonalizationScope.Shared),
WebBrowsable, WebDisplayName("Text"),
WebDescription("Enter your text")]
public string Text
{
get { return text; }
set { text = value; }
}public Boolean border;
[Category("Advanced Settings"),
Personalizable(PersonalizationScope.User),
WebBrowsable, WebDisplayName("Border"),
WebDescription("Do you want border")]
public Boolean Border
{
get { return border; }
set { border = value; }
}public enum ColorByEnum { Red, Blue, Green };
protected ColorByEnum colorBy;
[Category("Advanced Settings"),
Personalizable(PersonalizationScope.User),
WebBrowsable,
WebDisplayName("Background Color"),
WebDescription("Choose a background color for your webpart")]
public ColorByEnum ColorBy
{
get { return colorBy; }
set { colorBy = value; }
}
protected override void RenderWebPart(HtmlTextWriter output) { output.Write(this.text ); }public override ToolPart[] GetToolParts()
{
ToolPart[] toolpart = new ToolPart[3];
CustomPropertyToolPart custom = new CustomPropertyToolPart();
custom.Expand("Advanced Settings");
WebPartToolPart Wptp = new WebPartToolPart();
Wptp.FrameState = FrameState.Normal;
Wptp.FrameType = FrameType.Default;
toolpart[0] = Wptp;
toolpart[1] = custom;
return toolpart;
}The following properties can be added to costom controls in the tool part pane.

The custom property will be displayed automatically in the default property pane based on the property type string, bool, int or enum. The following table describes how each of these property types is displayed in the property pane.

In the coming articles we will see how to validate custom controls in tool part pane.
Download the sample source code here.
How do I see which items in a list or library have tags and notes?Without selecting each individual item and viewing the tags and notes dialog for each it seems that it’s just not possible. I won’t go into the long discussions we had about the different ways we could surface both the tags and notes information and the context of that information – but I will show you this screenshot of a library which adds a Tags And Notes Column so that at a glance it’s possible to see which items have tags or notes.

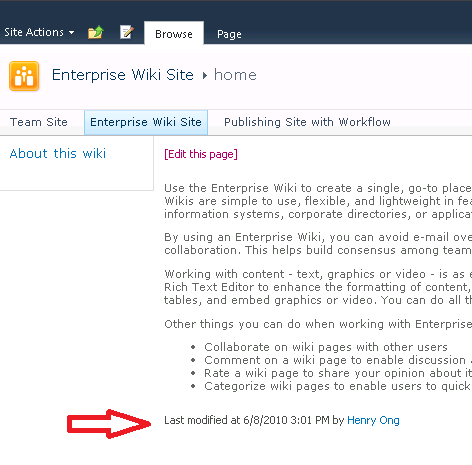
You’re working with the Enterprise Wiki Site Template and you don’t really like where the “Last modified…” information is located (above the content). You want to move that information to the bottom of the page.
Option 1: Modify the “EnterpriseWiki.aspx” Page Layout directly.
Option 2: Create a new Page Layout based on the original one and then modify that one.

We’ll go ahead and go with Option 2 since we don’t want to modify the out of the box template just in case we need it later on.
Navigate to the top level site of the Site Collection > Site Actions > Site Settings > Master pages (Under the Galleries section). Then switch over to the Documents tab in the Ribbon and then click New > Page Layout.

Select the Enterprise Wiki Page Content Type to associate with, give it a URL and Title. Note that there’s also a link on this page to create a new Content Type. You might be interested in doing this if you wanted to say, add more editing fields or metadata properties to the layout. For example if you wanted to add another Managed Metadata column to capture folksonomy aside from the already included “Wiki Categories” Managed Metadata column.

SharePoint Designer time! Hover over your newly created Page Layout and “Edit in Microsoft SharePoint Designer.”

Now you can choose to build your page manually by dragging your SharePoint Controls onto the page and laying them out as you’d like…

… Or you can copy and paste the OOB Enterprise Wiki Page Layout. I think I’ll do that. ![]()
Alright, so you’ve copied the contents of the EnterpriseWiki.aspx Page Layout and now it’s time for some customizing. I found the control I want to move, so I’ll simply do a copy or cut/paste to the new spot.

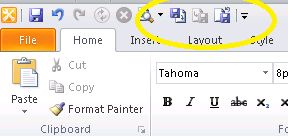
Check-in, publish, and approve the new Page Layout. Side note: I like to add the Check-In/Check-Out/Discard or Undo-Checkout buttons to all of my Office Applications’ Quick Access Toolbars for convenience.
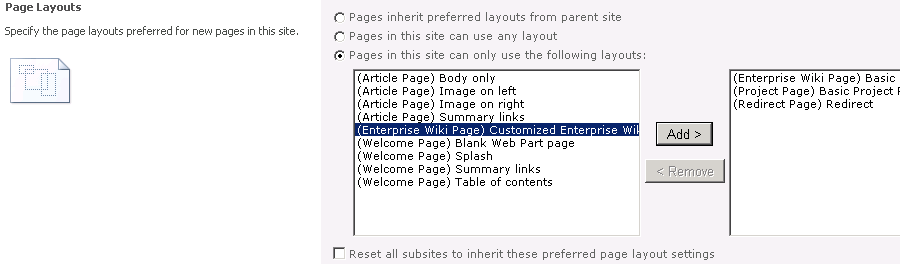
Almost there! Navigate to your publishing site, in this case the Enterprise Wiki Site, then go to Site Actions > Site Settings > Page layouts and site templates (Under Look and Feel). Here you’ll be able to make the new Page Layout available for use within the site.
Go back to your site and edit the page that you’d like to change the layout for. On the Page tab of the Ribbon, click on Page Layout and select your custom Page Layout.

Et voila! You just created a custom Page Layout using SharePoint Designer 2010, re-arranged a SharePoint control and managed to plan for the future by not modifying the out of the box template. That was a really simple example but I hope it helped to give you some ideas on how else you can customize Page Layouts within SharePoint 2010!
In this walkthrough I want to show you how to create a Sequential Workflow with Visual Studio 2010 for use in SharePoint 2010. – I will show how to create a custom Task Form for interaction with users. The Task form will be a native SharePoint list form. No InfoPath. There are many InfoPath samples out there but they cannot be used on a SharePoint Foundation 2010 platform. But workflows can be used on SharePoint Foundation 2010 too!
To reproduce the following steps you need to create a SharePoint site. – In the walkthrough I’ll use a Site Collection located at “http://sharepoint.local/sites/workflow”.
This blog post is part 1 of 2. It describes the steps 1 to 15. Read part 2 here: http://ikarstein.wordpress.com/2011/03/30/walkthrough-creating-a-simple-sequential-workflow-with-a-custom-task-form-in-sharepoint-2010-using-visual-studio-2010-part-2-of-2/
You can download – and help to develop – the whole demo project source code at Codeplex: http://spworkflowdemo.codeplex.com/
Let’s start…
1. We create the Site Collection. Use the “Blank Site” site template.
2. In Visual Studio 2010 we create a Empty SharePoint Project. I named it “ik.SharePoint2010.Workflow”
We create it with “Deploy as farm solution” and specify the location “http://sharepoint.local/sites/workflow/”.
3. This is the project structure at start:
4. First we need to create an instance of the Workflow History list that is needed for the workflow.
Create a new “Empty Element” project item named “Workflow History”.
Open the created “element.xml” file and modify it as shown below.
1: <?xml version="1.0" encoding="utf-8"?>2: <Elements xmlns="http://schemas.microsoft.com/sharepoint/">3: <ListInstance Title="Workflow History"4: OnQuickLaunch="TRUE"5: TemplateType="140"6: FeatureId="00BFEA71-4EA5-48D4-A4AD-305CF7030140"7: Url="Lists/WorkflowHistory"8: Description="">9: </ListInstance>10: </Elements>The “TemplateType” attribute represents the "Workflow History” list template. It resists on a SharePoint feature with ID “00BFEA71-4EA5-48D4-A4AD-305CF7030140”. It’s a native SharePoint feature.
You can add the attibute “Hidden” to the “ListInstance” tag and set it’s value to “TRUE” to hide the list as it’s done by SharePoint by default for this list. In this case you should also change “OnQuickLaunch” to “FALSE”. For my demo purpose I want to have “Workflow History” visible and on the Quick Launch bar.
5. Now we will create all tools we need for a “Workflow 1”. (May be I’ll create more workflow demos later. So it’s number 1.)
6. We create the SharePoint fields for “Workflow 1”. Therefore we create another “Empty Element” project item named “Workflow 1 Fields”.
I’ll create 3 fields for use in the Task Form we will create: Test1, Test2, Test3. They are all fields of type Text.
1: <?xml version="1.0" encoding="utf-8"?>2: <Elements xmlns="http://schemas.microsoft.com/sharepoint/">3: <!-- Fields for Task 1 of Workflow 1-->4: <Field ID="{2FE15855-3CAB-44A6-AB29-1600204FCA20}" Name="Workflow1Task1_Test1"5: MaxLength="255" DisplayName="Test1" Description=""6: Direction="None" Type="Text" Overwrite="TRUE"7: xmlns="http://schemas.microsoft.com/sharepoint/" />8: <Field ID="{517B22A5-1B89-4C24-82BE-3D4FD99645BC}" Name="Workflow1Task1_Test2"9: MaxLength="255" DisplayName="Test2" Description=""10: Direction="None" Type="Text" Overwrite="TRUE"11: xmlns="http://schemas.microsoft.com/sharepoint/" />12: <Field ID="{3ECFF1FE-F56B-4556-8805-4570D9422FF4}" Name="Workflow1Task1_Test3"13: MaxLength="255" DisplayName="Test3" Description=""14: Direction="None" Type="Text" Overwrite="TRUE"15: xmlns="http://schemas.microsoft.com/sharepoint/" />16: </Elements>
7. Now we create a new “Module” project item named “Workflow 1 Forms”. In this module we will store the Task Form.
Remove the “Sample.txt” file from the created module.
Create a new “Application Page” project item named “Task1Form.aspx”.
This project item will stored in the folder “Layouts\ik.SharePoint2010.Workflow”.
Move the project item “Task1Form.aspx” using Drag & Drop into the module “Workflow 1 Forms”.
Remove the “Layouts” folder from the project. It should be empty.
8. We open “Task1Form.aspx”
First we need to edit the “Page” tag of the ASPX site.
1: <%@ Page Language="C#" AutoEventWireup="true" CodeBehind="Task1Form.aspx.cs" Inherits="ik.SharePoint2010.Workflow.Task1Form" MasterPageFile="~masterurl/default.master" %>Now we insert the following code into the “PlaceHolderMain” content placeholder.
1: <asp:ScriptManagerProxy runat="server" ID="ProxyScriptManager">2: </asp:ScriptManagerProxy>3: <table width="100%" border="0" cellpadding="0" cellspacing="0">4: <tr>5: <td valign="top">6: <table cellspacing="0" cellpadding="4" border="0" width="100%">7: <tr>8: <td class="ms-vb">9: 10: </td>11: </tr>12: </table>13: <table border="0" width="100%">14: <tr>15: <td>16: <table border="0" cellspacing="0" width="100%">17: <tr>18: <td class="ms-formlabel" valign="top" nowrap="true" width="25%">19: <b> Title:</b>20: </td>21: <td class="ms-formbody" valign="top" width="75%">22: <SharePoint:FormField runat="server" ID="ff4" ControlMode="Display" FieldName="Title" /><br />23: </td>24: </tr>25: <tr>26: <td width="25%" class="ms-formlabel">27: <b> Test1:</b>28: </td>29: <td width="75%" class="ms-formbody">30: <SharePoint:FormField runat="server" ID="ff1" ControlMode="Edit" FieldName="Workflow1Task1_Test1" />31: <SharePoint:FieldDescription runat="server" ID="ff1description" FieldName="Workflow1Task1_Test1"32: ControlMode="Edit" />33: </td>34: </tr>35: <tr>36: <td width="25%" class="ms-formlabel">37: <b> Test2:</b>38: </td>39: <td width="75%" class="ms-formbody">40: <SharePoint:FormField runat="server" ID="ff2" ControlMode="Edit" FieldName="Workflow1Task1_Test2" />41: <SharePoint:FieldDescription runat="server" ID="ff2description" FieldName="Workflow1Task1_Test2"42: ControlMode="Edit" />43: </td>44: </tr>45: <tr>46: <td width="25%" class="ms-formlabel">47: <b> Test3:</b>48: </td>49: <td width="75%" class="ms-formbody">50: <SharePoint:FormField runat="server" ID="ff3" ControlMode="Edit" FieldName="Workflow1Task1_Test3" />51: <SharePoint:FieldDescription runat="server" ID="ff3description" FieldName="Workflow1Task1_Test3"52: ControlMode="Edit" />53: </td>54: </tr>55: </table>56: </td>57: </tr>58: </table>59: <table cellspacing="0" cellpadding="4" border="0" width="100%">60: <tr>61: <td nowrap="nowrap" class="ms-vb">62: <asp:Button Text="Save As Draft" runat="server" ID="btnSaveAsDraft" />63: </td>64: <td>65: <asp:Button Text="Complete Task" runat="server" ID="btnComplete" />66: </td>67: <td nowrap="nowrap" class="ms-vb" width="99%">68: <asp:Button Text="Cancel" runat="server" ID="btnCancel" />69: </td>70: </tr>71: </table>72: </td>73: <td width="1%" class="ms-vb" valign="top"> </td>74: </tr>75: </table>76:Now we add some ASP.NET code into the “PlaceHolderPageTitle” content placeholder.
1: <SharePoint:ListFormPageTitle runat="server" />Furthermore we add this lines of code into the “PlaceHolderPageTitleInTitleArea” content placeholder.
1: <span class="die">2: <SharePoint:ListProperty Property="LinkTitle" runat="server" ID="ID_LinkTitle" />3: : </span>4: <SharePoint:ListItemProperty ID="ID_ItemProperty" MaxLength="40" runat="server" />At least we add the following code into the “PlaceHolderAdditionalPageHead” content placeholder.
1: <SharePoint:UIVersionedContent UIVersion="4" runat="server">2: <contenttemplate>3: <SharePoint:CssRegistration Name="forms.css" runat="server"/>4: </contenttemplate>5: </SharePoint:UIVersionedContent>You can see the input fields for the three fields of Task 1. Furthermore you see three buttons. For them we now create some “code behind”.
1: using System;2: using Microsoft.SharePoint;3: using Microsoft.SharePoint.WebControls;4: using Microsoft.SharePoint.Utilities;5:6: namespace ik.SharePoint2010.Workflow7: {8: public partial class Task1Form : WebPartPage9: {10: protected void Page_Load(object sender, EventArgs e)11: {12: btnSaveAsDraft.Click += new EventHandler (btnSaveAsDraft_Click);13: btnComplete.Click += new EventHandler (btnComplete_Click);14: btnCancel.Click += new EventHandler (btnCancel_Click);15: }16:17: void btnCancel_Click(object sender, EventArgs e)18: {19: CloseForm();20: }21:22: private void CloseForm()23: {24: if ( ( SPContext.Current != null ) && SPContext.Current.IsPopUI )25: {26: this.Context.Response.Write("<script'>window.frameElement.commitPopup();</script>" );27: this.Context.Response.Flush();28: this.Context.Response.End();29: }30: else31: {32: string str = this.Page.Request.QueryString["Source"];33: if ( ( str != null ) && ( str.Length > 0 ) )34: {35: SPUtility.Redirect(string.Empty, SPRedirectFlags.UseSource, this.Context);36: }37: }38: }39:40: void btnComplete_Click(object sender, EventArgs e)41: {42: SPList l = SPContext.Current.List;43: SPListItem li = SPContext.Current.ListItem;44: li[SPBuiltInFieldId.TaskStatus] = "Tasks_Completed" ;45: li[SPBuiltInFieldId.PercentComplete] = 1;46:47: SaveButton.SaveItem(SPContext.Current, false , "" );48:49: CloseForm();50: }51:52: void btnSaveAsDraft_Click(object sender, EventArgs e)53: {54: SaveButton.SaveItem(SPContext.Current, false , "" );55:56: CloseForm();57: }58: }59: }We need to modify the “Elements.xml” file of the module named “Workflow 1 Forms”.
1: <?xml version="1.0" encoding="utf-8"?>2: <Elements xmlns="http://schemas.microsoft.com/sharepoint/">3: <Module Name="Workflow 1 Forms" Url="Workflow1Forms" RootWebOnly="FALSE">4: <File Path="Workflow 1 Forms\Task1Form.aspx" Url="Task1Form.aspx" />5: </Module>6: </Elements>This specifies there to store the “Task1Form.aspx” file in the site structure.
9. In the next step we create the task list that will contain our workflow tasks.
First create a “List Definition” project item named “Workflow 1 Tasks”.
Use “Workflow 1 Tasks” as name of the list definition and “Tasks” as base type. Check “Add a list instance…”.
10. Now open “Elements.xml” of the new list definition project item.
We need to change the identifier of the list type we create! – It must be “107”. This is the list template ID for workflow tasks lists in SharePoint. The workflow designer will search for a list with this type inside the site where a new workflow will be created.
Here is the content of “Elements.xml” after our modification:
1: <?xml version="1.0" encoding="utf-8"?>2: <Elements xmlns="http://schemas.microsoft.com/sharepoint/">3: <ListTemplate4: Name="Workflow 1 Tasks"5: Type="107"6: BaseType="0"7: OnQuickLaunch="TRUE"8: SecurityBits="11"9: Sequence="360"10: DisplayName="Workflow 1 Tasks"11: Description="Tasks of Workflow 1"12: Image="/_layouts/images/itgen.png"/>13: </Elements>
11. Now we modify the “Elements.xml” file of the list instance that will be created during deployment:
Here we also need to modify the type identifier to “107”. Furthermore we change the list url: “Lists/Workflow1Tasks”.
Here is the complete content of “Elements.xml”:
1: <?xml version="1.0" encoding="utf-8"?>2: <Elements xmlns="http://schemas.microsoft.com/sharepoint/">3: <ListInstance Title="Workflow 1 Tasks"4: OnQuickLaunch="TRUE"5: TemplateType="107"6: Url="Lists/Workflow1Tasks"7: Description="Tasks of Workflow 1">8: </ListInstance>9: </Elements>In a “real world” scenario we would prevent the list from being listed on the Quick Launch bar. So the corresponding parameter must be set to “FALSE”.
12. Now we need to modify the “Schema.xml” file of the list definition.
First we set the list type to “107” and configure some other attributes:
1: <List xmlns:ows="Microsoft SharePoint" Title="Workflow 1 Tasks"2: FolderCreation="FALSE" Direction="$Resources:Direction;"3: EnableContentTypes="TRUE" VersioningEnabled="TRUE"4: Url="Lists/Workflow1Tasks"5: Type="107" BaseType="0"6: xmlns="http://schemas.microsoft.com/sharepoint/">7: […]Now remove the the content types defined in the “ContentTypes” tag in the “schema.xml” file.
Insert this content type definition into the “ContentTypes” tag:
1: <ContentType ID="0x01080100FFbc98c2529347a5886b8d2576b954ef"2: Name="Workflow 1 Tasks 1"3: Group="Workflow 1 Tasks"4: Description="Content Type of Tasks 1 of Workflow 1">5: <FieldRefs>6: <FieldRef ID="{2FE15855-3CAB-44A6-AB29-1600204FCA20}" Name="Workflow1Task1_Test1" DisplayName="Test1" Required="FALSE" Hidden="FALSE" ReadOnly="FALSE" PITarget="" PrimaryPITarget="" PIAttribute="" PrimaryPIAttribute="" Aggregation="" Node="" />7: <FieldRef ID="{517B22A5-1B89-4C24-82BE-3D4FD99645BC}" Name="Workflow1Task1_Test2" DisplayName="Test2" Required="FALSE" Hidden="FALSE" ReadOnly="FALSE" PITarget="" PrimaryPITarget="" PIAttribute="" PrimaryPIAttribute="" Aggregation="" Node="" />8: <FieldRef ID="{3ECFF1FE-F56B-4556-8805-4570D9422FF4}" Name="Workflow1Task1_Test3" DisplayName="Test3" Required="FALSE" Hidden="FALSE" ReadOnly="FALSE" PITarget="" PrimaryPITarget="" PIAttribute="" PrimaryPIAttribute="" Aggregation="" Node="" />9:10: <FieldRef ID="{c042a256-787d-4a6f-8a8a-cf6ab767f12d}" Name="ContentType" />11: <FieldRef ID="{fa564e0f-0c70-4ab9-b863-0177e6ddd247}" Name="Title" Required="TRUE" ShowInNewForm="TRUE" ShowInEditForm="TRUE" />12: <FieldRef ID="{c3a92d97-2b77-4a25-9698-3ab54874bc6f}" Name="Predecessors" />13: <FieldRef ID="{a8eb573e-9e11-481a-a8c9-1104a54b2fbd}" Name="Priority" />14: <FieldRef ID="{c15b34c3-ce7d-490a-b133-3f4de8801b76}" Name="Status" />15: <FieldRef ID="{d2311440-1ed6-46ea-b46d-daa643dc3886}" Name="PercentComplete" />16: <FieldRef ID="{53101f38-dd2e-458c-b245-0c236cc13d1a}" Name="AssignedTo" />17: <FieldRef ID="{7662cd2c-f069-4dba-9e35-082cf976e170}" Name="Body" />18: <FieldRef ID="{64cd368d-2f95-4bfc-a1f9-8d4324ecb007}" Name="StartDate" />19: <FieldRef ID="{cd21b4c2-6841-4f9e-a23a-738a65f99889}" Name="DueDate" />20: <FieldRef ID="{58ddda52-c2a3-4650-9178-3bbc1f6e36da}" Name="WorkflowLink" />21: <FieldRef ID="{16b6952f-3ce6-45e0-8f4e-42dac6e12441}" Name="OffsiteParticipant" />22: <FieldRef ID="{4a799ba5-f449-4796-b43e-aa5186c3c414}" Name="OffsiteParticipantReason" />23: <FieldRef ID="{18e1c6fa-ae37-4102-890a-cfb0974ef494}" Name="WorkflowOutcome" />24: <FieldRef ID="{e506d6ca-c2da-4164-b858-306f1c41c9ec}" Name="WorkflowName" />25: <FieldRef ID="{ae069f25-3ac2-4256-b9c3-15dbc15da0e0}" Name="GUID" />26: <FieldRef ID="{8d96aa48-9dff-46cf-8538-84c747ffa877}" Name="TaskType" />27: <FieldRef ID="{17ca3a22-fdfe-46eb-99b5-9646baed3f16}" Name="FormURN" />28: <FieldRef ID="{78eae64a-f5f2-49af-b416-3247b76f46a1}" Name="FormData" />29: <FieldRef ID="{8cbb9252-1035-4156-9c35-f54e9056c65a}" Name="EmailBody" />30: <FieldRef ID="{47f68c3b-8930-406f-bde2-4a8c669ee87c}" Name="HasCustomEmailBody" />31: <FieldRef ID="{cb2413f2-7de9-4afc-8587-1ca3f563f624}" Name="SendEmailNotification" />32: <FieldRef ID="{4d2444c2-0e97-476c-a2a3-e9e4a9c73009}" Name="PendingModTime" />33: <FieldRef ID="{35363960-d998-4aad-b7e8-058dfe2c669e}" Name="Completed" />34: <FieldRef ID="{1bfee788-69b7-4765-b109-d4d9c31d1ac1}" Name="WorkflowListId" />35: <FieldRef ID="{8e234c69-02b0-42d9-8046-d5f49bf0174f}" Name="WorkflowItemId" />36: <FieldRef ID="{1c5518e2-1e99-49fe-bfc6-1a8de3ba16e2}" Name="ExtendedProperties" />37: </FieldRefs>38: <XmlDocuments>39: <XmlDocument NamespaceURI="http://schemas.microsoft.com/sharepoint/v3/contenttype/forms">40: <FormTemplates xmlns="http://schemas.microsoft.com/sharepoint/v3/contenttype/forms">41: <Display>ListForm</Display>42: <Edit>ListForm</Edit>43: <New>ListForm</New>44: </FormTemplates>45: </XmlDocument>46: <XmlDocument NamespaceURI="http://schemas.microsoft.com/sharepoint/v3/contenttype/forms/url">47: <FormUrls xmlns="http://schemas.microsoft.com/sharepoint/v3/contenttype/forms/url">48: <Edit>Workflow1Forms/Task1Form.aspx</Edit>49: </FormUrls>50: </XmlDocument>51: </XmlDocuments>52: </ContentType>53:54:You see the “FormUrls” tag? Inside this tag we specify our custom form template we created before.
The new content type is derived from the “Workflow Task” content type 0×010801. – In the “FieldRefs” section we add our fields we need inside the workflow.
13. Now we need to add the field definitions of our custom fields to the “Schema.xml”. Copy them from the “Elements.xml” file of project item “Workflow 1 Fields” into the “Fields” tag of “Schema.xml”:
Furthermore you need to add a field definition for the field “Completed”:
1: <Field ID="{35363960-D998-4aad-B7E8-058DFE2C669E}" Name="Completed"2: SourceID="http://schemas.microsoft.com/sharepoint/v3"3: StaticName="Completed" Group="Base Columns" Type="Boolean"4: DisplayName="Completed" Hidden="TRUE" Sealed="TRUE"5: Overwrite="TRUE" xmlns="http://schemas.microsoft.com/sharepoint/">6: <Default> FALSE</Default>7: </Field>
14. Now deploy the project.
While deployment you may get this dialog:
Check “Do not prompt…”. Press “Resolve Automatically” – it’s your only option
.
15. Have a look into the site using the browser. – We will test our “Edit” form. Remember that we did not specify special “New” form or “Display” form. This you could do the same way as you created the “Edit” form.
We see our lists in the Quick Launch.
Open the “Workflow 1 Tasks” list. On the Ribbon open the “Items” tab. We see our Content Type in the New Item submenu:
Create an item of this type. You see a standard “New” form and on it you see our three “Test” fields:
Enter some data and press “Save”.
Open the item in “Edit” form. Now you should see our custom list form.
If you click “Save As Draft” your changes will be stored in the task item. If you click “Complete Task” two item fields will be changed in addition to the changes made in the form: It sets “Status” to “Tasks_Completed” and "% Complete" to "100". You can see this in the Code Behind file of the list form.
Test all buttons.
After “Complete Task”:
You see: “% Complete” is set to “100 %”.
So far our projects works as expected.


