This article is going to group the rest of the options within our Custom Actions drop-down in SharePoint Designer 2010 together, as they are all basically doing the same thing, adding an item to the Ribbon UI, just for different forms (View, Edit, New, and Display).
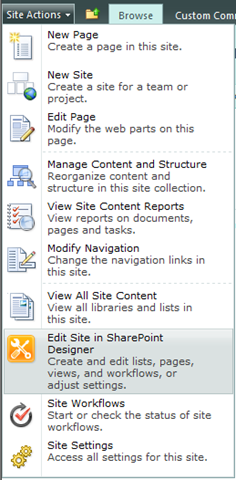 First, let’s open SharePoint Designer 2010 back up. So, let’s go into our 2010 test site, and click on the Edit Site in SharePoint Designer action off of the Site Actions menu.
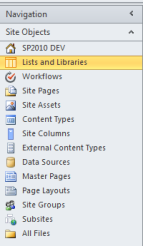
Now that we have SharePoint Designer open, click on Lists and Libraries, under the Navigation > Site Objects, area on the left-hand side of your window.
Here is a quick little tip while we are here as well, that is new in SharePoint Designer 2010. If you hover your cursor over Lists and Libraries, as well as any of the other Site Objects navigation options, you will see a thumbtack appear on the right.

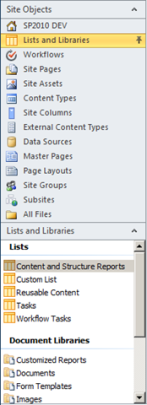
If you click on this, it will expand your Lists and Libraries, or any of the other options, below the Site Objects on the left-hand side, allowing you 2007-like left-side navigation navigation between your objects.
Now, on with the show… as I mentioned back towards the start of this article, we’re going to look at the remaining Custom Actions we can build into our lists from SharePoint Designer 2010.
Click on any list that you have on the site. In this example, we will be using a tasks list that I had created for demonstration purposes.
 Now that we have our Tasks list loaded, we do not want to use the Custom Actions window in the lower-right hand side of our screen. This will automatically create a Custom Action for the List Item Menu if we click on the New… button. No, to create other types of Custom Actions, we need to use the Custom Action menu in the Ribbon UI to do what we are looking to do.
You will however notice, that by clicking here, the Ribbon context at the top of the screen changes from the List Settings ribbon, to the Custom Actions ribbon.
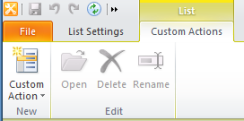
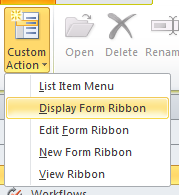
We are going to use the Custom Actions ribbon to create our first of four custom actions for this article. First, we are going to start with the Display Form Ribbon. To start creating one of these, click on the Custom Action button in the ribbon, and select Display Form Ribbon
By doing so, we see the familiar Create Custom Action window pop-up that we saw in my last article on the subject.
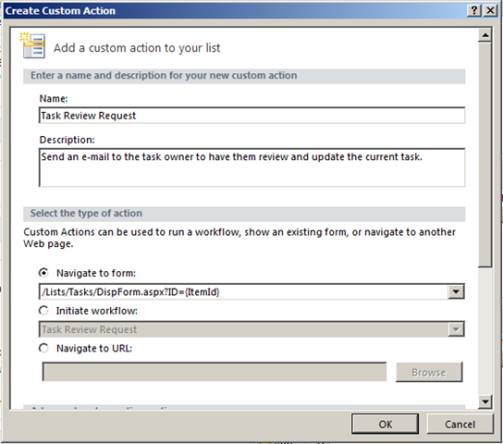
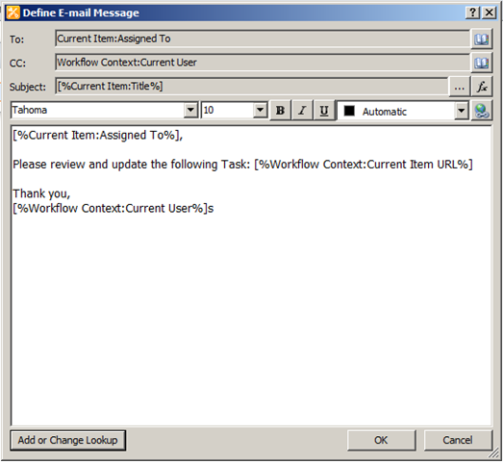
For our example, lets fill in a Name, Description, and under the Select Type of Action, we are going to choose Initiate workflow. For this, I just created a simple list-level workflow, which will e-mail the owner of the task, CC’ing the current user, to request them to review and update the task, with a link back to the task (see screenshot below).
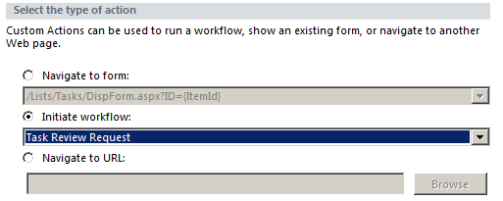
Select our workflow from the drop-down next, in this example, our workflow name is Task Review Request.
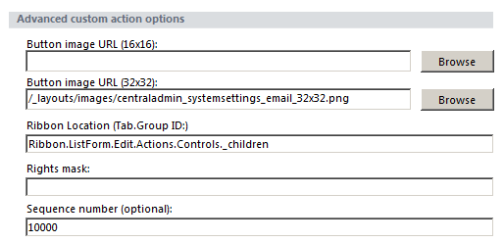
Next, if we scroll down in our window, we are going to specify a 32×32 image, so that we have a fancy little icon to go with our button. We could sue a 16×16, but, that will be quite small, and since we’re on the ribbon, we want this to stick out a bit. So, I browsed in the layouts folder in the SharePoint root to find an e-mail related icon, and did, at /_layouts/images/centraladmin_systemsettings_email_32x32.png. You could also use the Browse button to find a local image on your computer or network file share to use.
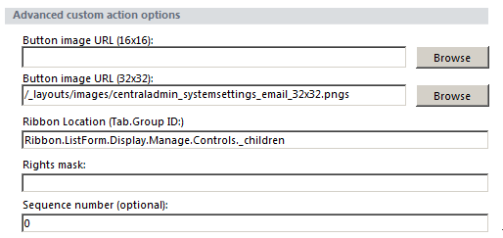
You will also see in the advanced section, that the wizard automatically entered in the Ribbon Location. This location, Ribbon.ListForm.Display.Manage.Controls._children, is great, because, really, were you going to remember that? Here is a listing of what each of these options are:
I have also created a blog post, just with this information, available here, which I will reference in later articles, as needed: SharePoint 2010 Custom Actions – Default Form Ribbon Locations
Now, below there, there is the options for Rights mask. This allows you to assign permissions of who can actually see this custom action. If the user does not meet the requirements, which are comma separated values from the SPBasePermissions class enumeration, they do not see the custom action. We will not apply any currently to this item, leaving it for all to see. But, the option is there.
You can choose your own sequence number for this as well. Generally, the best practice is to use anything over 10,000.
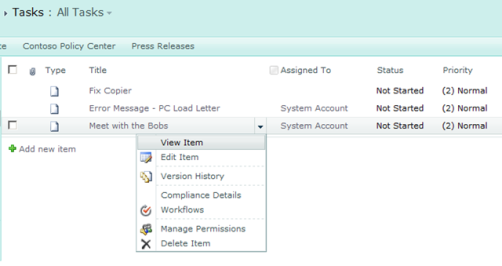
Now, once we are set with this, lets click on OK on the Custom Action Wizard, and now lets see this in action! Let’s go back to our list in SharePoint… Let’s use the List Item Menu, and select View Item
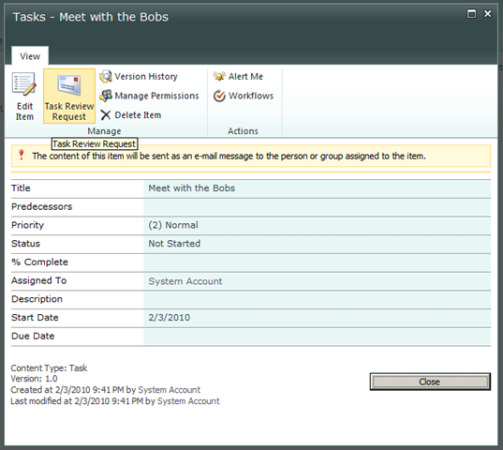
We will get a modal dialog window now with the Display Form, that we linked our Custom Action to. As you will see, we now have a new icon in our View Ribbon, which shows our fancy little e-mail icon, as well as the title of the Custom Action:
Clicking on this will then initiate the workflow which we associated with the Custom Action
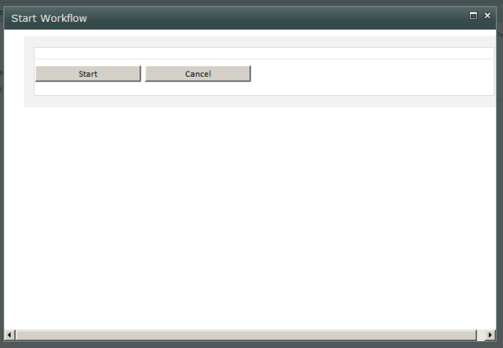
And once we click Start on the workflow initiation form, the workflow will then start! Very cool stuff.

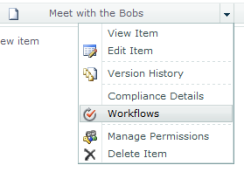
To be sure it is actually doing its thing, let’s check the workflows for that list item, back from the main list page, by selecting the Workflows option from the List Item Menu.
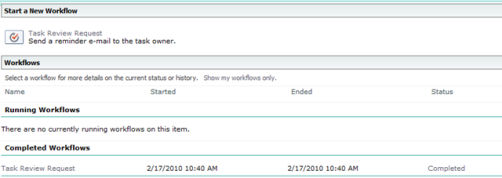
Once the page loads, you will see we have a completed workflow for our Task Review Request workflow that we created
Now, to finish up this article, we’re going to add the same Custom Action to the other forms on this site as well. So, back in SharePoint Designer 2010, opened to our list, lets create a new Custom Action for each of the other three forms, and see where they show up.
The only change we are going to make however, for each one, is just in the title. We could have it named the same thing for each form, sure, but, I want to show you where these end up in the SharePoint UI, and to do so, I am doing to insert the name of the form into our Custom Action title.
As you can see, when we choose a different ribbon location for our Custom Action, we get a new Ribbon Location automatically populated for us:
Follow the previous steps in the article if you need to to create these additional actions. When finished, we should have four Custom Actions in total assigned to our list, one for each of the form types:

Now, let’s head back to our our SharePoint site and see where these now appear in the UI.
First – let’s have a look at the List View form ribbon – click on the Items tab under the List Tools ribbon , and you will see a section for Actions. You will also see in here, that our ViewForm Custom Action is available here. What does this allow us to do? Well, using the multiple-item selection functionality in SharePoint 2010, we can run our action against multiple list items!
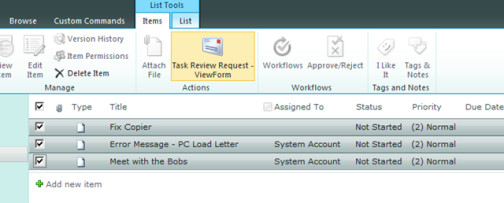
Well, you would think… but if you attempt to do so, you will get an error, so, only do this on a per-item basis. The functionality is not smart enough to fire up three consecutive workflows by using SharePoint Designer 2010 for each of the items you have selected. It will work fine when going through them one by one.
Next, if we go into the Edit Item view form for one of our tasks
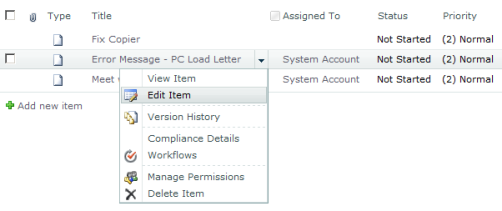
We will see that we have our Custom Action appearing in the Actions area of the form
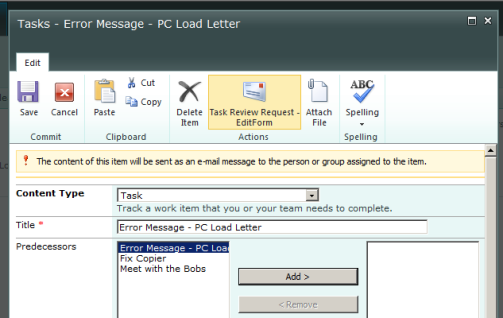
And the same goes for when we go to create a new Task
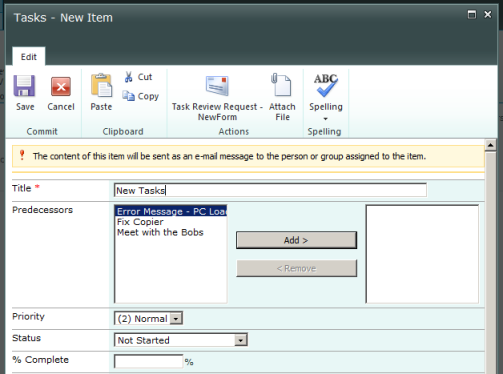
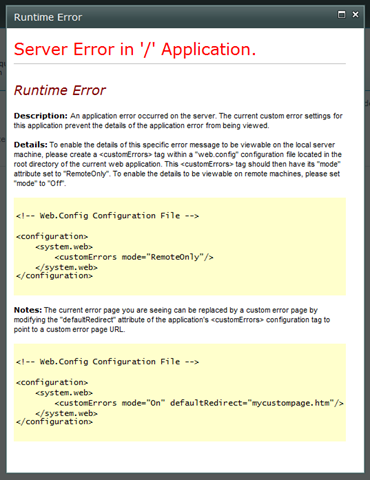
However, until the task is created, you will not be able to run the workflow, as until you hit Save on the new item form, your task does not exist as of yet, so, the workflow has nothing to bind to, just something to keep in mind when creating your Custom Actions in SharePoint Designer 2010. If you do try and run your workflow from your Custom Action – you will get the lovely Runtime Error.
I just wanted to show you where this would appear, and that even though the Edit and New Forms use the same Ribbon Location (Ribbon.ListForm.Edit.Actions.Controls._children), they are actually bound to the individual forms themselves.
I hope this article was informative, and helps shed some light on some of the new functionality available in SharePoint 2010, and SharePoint Designer 2010. Please let me know what you think, or leave any questions regarding this material in the comments, and I will answer them as soon as I can.
 First, let’s open SharePoint Designer 2010 back up. So, let’s go into our 2010 test site, and click on the Edit Site in SharePoint Designer action off of the Site Actions menu.
Now that we have SharePoint Designer open, click on Lists and Libraries, under the Navigation > Site Objects, area on the left-hand side of your window.
Here is a quick little tip while we are here as well, that is new in SharePoint Designer 2010. If you hover your cursor over Lists and Libraries, as well as any of the other Site Objects navigation options, you will see a thumbtack appear on the right.

If you click on this, it will expand your Lists and Libraries, or any of the other options, below the Site Objects on the left-hand side, allowing you 2007-like left-side navigation navigation between your objects.
Now, on with the show… as I mentioned back towards the start of this article, we’re going to look at the remaining Custom Actions we can build into our lists from SharePoint Designer 2010.
Click on any list that you have on the site. In this example, we will be using a tasks list that I had created for demonstration purposes.
 Now that we have our Tasks list loaded, we do not want to use the Custom Actions window in the lower-right hand side of our screen. This will automatically create a Custom Action for the List Item Menu if we click on the New… button. No, to create other types of Custom Actions, we need to use the Custom Action menu in the Ribbon UI to do what we are looking to do.
 You will however notice, that by clicking here, the Ribbon context at the top of the screen changes from the List Settings ribbon, to the Custom Actions ribbon.

We are going to use the Custom Actions ribbon to create our first of four custom actions for this article. First, we are going to start with the Display Form Ribbon. To start creating one of these, click on the Custom Action button in the ribbon, and select Display Form Ribbon

By doing so, we see the familiar Create Custom Action window pop-up that we saw in my last article on the subject.

For our example, lets fill in a Name, Description, and under the Select Type of Action, we are going to choose Initiate workflow. For this, I just created a simple list-level workflow, which will e-mail the owner of the task, CC’ing the current user, to request them to review and update the task, with a link back to the task (see screenshot below).

Select our workflow from the drop-down next, in this example, our workflow name is Task Review Request.

Next, if we scroll down in our window, we are going to specify a 32×32 image, so that we have a fancy little icon to go with our button. We could sue a 16×16, but, that will be quite small, and since we’re on the ribbon, we want this to stick out a bit. So, I browsed in the layouts folder in the SharePoint root to find an e-mail related icon, and did, at /_layouts/images/centraladmin_systemsettings_email_32x32.png. You could also use the Browse button to find a local image on your computer or network file share to use.

You will also see in the advanced section, that the wizard automatically entered in the Ribbon Location. This location, Ribbon.ListForm.Display.Manage.Controls._children, is great, because, really, were you going to remember that? Here is a listing of what each of these options are:
| Form Name | Ribbon Location |
| Display Form | Ribbon.ListForm.Display.Manage.Controls._children |
| Edit Form | Ribbon.ListForm.Edit.Actions.Controls._children |
| New Form | Ribbon.ListForm.Edit.Actions.Controls._children |
| View Form | Ribbon.ListItem.Actions.Controls._children |
Now, below there, there is the options for Rights mask. This allows you to assign permissions of who can actually see this custom action. If the user does not meet the requirements, which are comma separated values from the SPBasePermissions class enumeration, they do not see the custom action. We will not apply any currently to this item, leaving it for all to see. But, the option is there.
You can choose your own sequence number for this as well. Generally, the best practice is to use anything over 10,000.
Now, once we are set with this, lets click on OK on the Custom Action Wizard, and now lets see this in action! Let’s go back to our list in SharePoint… Let’s use the List Item Menu, and select View Item

We will get a modal dialog window now with the Display Form, that we linked our Custom Action to. As you will see, we now have a new icon in our View Ribbon, which shows our fancy little e-mail icon, as well as the title of the Custom Action:

Clicking on this will then initiate the workflow which we associated with the Custom Action

And once we click Start on the workflow initiation form, the workflow will then start! Very cool stuff.

To be sure it is actually doing its thing, let’s check the workflows for that list item, back from the main list page, by selecting the Workflows option from the List Item Menu.

Once the page loads, you will see we have a completed workflow for our Task Review Request workflow that we created

Now, to finish up this article, we’re going to add the same Custom Action to the other forms on this site as well. So, back in SharePoint Designer 2010, opened to our list, lets create a new Custom Action for each of the other three forms, and see where they show up.
The only change we are going to make however, for each one, is just in the title. We could have it named the same thing for each form, sure, but, I want to show you where these end up in the SharePoint UI, and to do so, I am doing to insert the name of the form into our Custom Action title.
As you can see, when we choose a different ribbon location for our Custom Action, we get a new Ribbon Location automatically populated for us:

Follow the previous steps in the article if you need to to create these additional actions. When finished, we should have four Custom Actions in total assigned to our list, one for each of the form types:

Now, let’s head back to our our SharePoint site and see where these now appear in the UI.
First – let’s have a look at the List View form ribbon – click on the Items tab under the List Tools ribbon
 , and you will see a section for Actions. You will also see in here, that our ViewForm Custom Action is available here. What does this allow us to do? Well, using the multiple-item selection functionality in SharePoint 2010, we can run our action against multiple list items!
Well, you would think… but if you attempt to do so, you will get an error, so, only do this on a per-item basis. The functionality is not smart enough to fire up three consecutive workflows by using SharePoint Designer 2010 for each of the items you have selected. It will work fine when going through them one by one.
Next, if we go into the Edit Item view form for one of our tasks

We will see that we have our Custom Action appearing in the Actions area of the form

And the same goes for when we go to create a new Task

However, until the task is created, you will not be able to run the workflow, as until you hit Save on the new item form, your task does not exist as of yet, so, the workflow has nothing to bind to, just something to keep in mind when creating your Custom Actions in SharePoint Designer 2010. If you do try and run your workflow from your Custom Action – you will get the lovely Runtime Error.

I just wanted to show you where this would appear, and that even though the Edit and New Forms use the same Ribbon Location (Ribbon.ListForm.Edit.Actions.Controls._children), they are actually bound to the individual forms themselves.
I hope this article was informative, and helps shed some light on some of the new functionality available in SharePoint 2010, and SharePoint Designer 2010. Please let me know what you think, or leave any questions regarding this material in the comments, and I will answer them as soon as I can.
Adding Custom Actions to the List Item Menu in SharePoint 2010 Using SharePoint Designer 2010
Hi Srikanth,
ReplyDeleteIt was nice post and helped me a lot.
I wanted to compare the ribbon button name as a source in SharePoint Designer workflow if condition.
I created two ribbon buttons Approve and Reject.
When I clicked on any button they will call the workflow as you showed above.
Depends on ribbon button clicked it has to do the different action. But I am not able to compare the Approve or Reject ribbon buttons as source in the if condition.
I know I can achieve this with creating two workflows but here I wanted to create only one worlflow.
Can you please explain me how can I achieve this.
Thanks in advance.