If a workflow is set to start when an item is changed, you might think that it's impossible to determine exactly which field, or fields, have changed. This is because the workflow doesn't start until after the item has already changed. This can actually be accomplished though, using a SharePoint Designer workflow without too much pain.
The Scenario
For our scenario, we have a document library named "Documents". We have added a custom column named "Comments" to that library. If the Comments field ever changes on any item, we want to receive an email letting us know what the comments were before the change was made, and what the comments are now. Here is how you can accomplish that using a workflow written in SharePoint Designer 2007.
Step 1: Create a Duplicate Document Library
The trick that were going to employ is to create a second copy of the document library. We'll let our workflow keep this library synchronized with the first library. This library will need to be set up exactly like the first one, including the custom "Comments" field. We'll name this library, "Documents2". Note: The Comments field on the Documents library MUST be a required field. If it isn't, the workflow will start as soon as new documents are uploaded, even before you enter in the original comments. By making this a required field, the workflow will wait on the Comments to be entered before it sends the synchronized copy to the Documents2 library.
Step 2: Begin Writing the Workflow
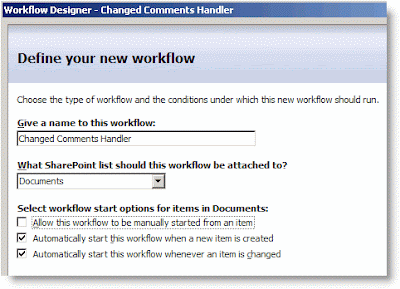
Open your site in SharePoint Designer 2007 and create a new workflow. Here are the options I chose:
Name: Changed Comments Handler
List: Documents
Start: Automatically start this workflow when a new item is created AND Automatically start this workflow whenever an item is changed.

The only thing that deserves an explanation are the Start Options. Remember that our workflow is responsible for keeping Documents and Documents2 synchronized. In order to do this, it will need to start whenever a new item is created and whenever an item is changed.
Step 3: In the Workflow, Add a Condition and Action to Handle New Documents
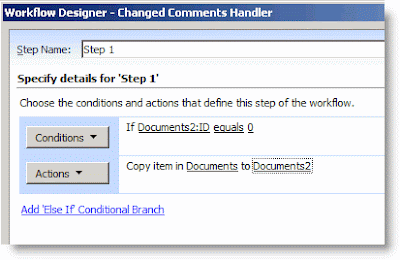
To see if a new document has been uploaded to Documents, we'll compare its name to the names of the documents in Documents2. If a document with that name ISN'T found in the Documents2 library, our workflow will send a copy there.
- Click on the Conditions button and choose Compare any data source.
- Click on the first value link and then the Display data binding [fx] button.
- In the Define Workflow Lookup dialog box, set the Source to Documents2:ID. Then, in the Find the List Item section, set the Field to Documents2:Name (for use in forms). For the Value, click on [fx]. In this second Define Workflow Lookup dialog box, choose Current Item: Name (for use in forms).
- Click OK, OK to close both dialog boxes. You will receive a warning that the lookup isn't guaranteed to return a single value. That's OK--it just means that Workflow Designer can't guarantee that there will only be one item in the list that has the same name. Just click Yes to continue.
- The first value returned will be the ID of the document in Documents2. If the document exists, this will be an integer greater than zero. If no document exists with the same name, this value will be zero. Click on the second value link and enter 0.
- To create the action for this condition, click on the Actions button and select Copy List Item.
- Click on the first this list link, choose Current Item, and click OK.
- Click on the second this list link, choose Documents2, and click OK.
Your workflow should like this:

Step 4: In the Workflow, Add a Condition to Handle Changed Comments
For this scenario, we don't care if anything else changes except the Comments field. We need to add a Condition to handle this scenario if it should occur.
- Click on Add 'Else If' Conditional Branch.
- Click on the Conditions button and choose Compare Documents field.
- Click on the first value link and choose Comments. This will refer to the Comments filed in the Documents library.
- Click on the second value link and and then [fx]. In the Define Workflow Lookup dialog box, set the Source to Documents2: Comments. This will allow us to compare the Comments field for the current item in the Documents library with the Comments field for the item with the same Name in the Documents2 library.
- In order to complete the Lookup, you need to set the options in the Find the List Item section. For Field, choose Documents2:Name (for use in forms).
- For Value, click on [fx]. In the new Define Workflow Lookup dialog box, choose Current Item, Name (for use in forms). This will cause the workflow to only use Comments field from an item in Documents2 that has the same Name as the document in Documents library.
- Click on OK, OK. Click Yes, again, when prompted about unique lookups.
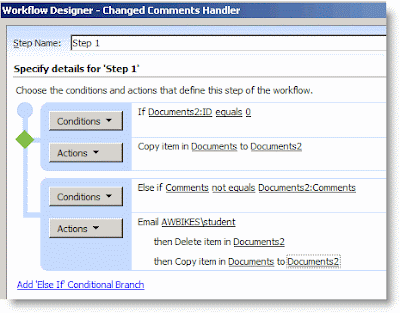
- To finish this up, we only want the Action to fire when the two Comments fields aren't equal. Click on equals, and change it to not equals.
Now that you have finished writing the Condition, you are ready to write the Action. In this action, the workflow will send an email to a particular user that includes the previous comments and the new comments. Then the workflow will delete the item in Documents2 that has the same name and copy over the new item to Documents2.
- Click on Actions, and choose Send an Email.
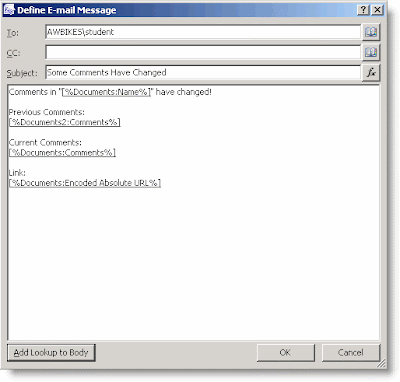
- Click on the this message link. A new dialog box will open for you to define the E-mail.
- Choose a recipient by clicking on the Select Users icon beside the To box.
- For the subject, I entered Some Comments Have Changed.
- In this dialog box, you can enter your own text and then use the Add Lookup to Body button to add other variables to your email. I added the name of the document, a link to the document, the Previous Comments, and the Current Comments. If you've followed along with the Lookups so far, you shouldn't have much trouble figuring out how to create the lookups in your email. When you are finished composing the email, click OK.
- Click on Actions, and choose Delete Item.
- Click on the this list link. In the Choose List Item dialog for the List select Documents2.
- In the Find the List Item section, for the Field, select Documents2:Name (for use in forms). For the Value, click on [fx], and choose Current Item: Name (for use in forms).
- Click on OK, OK. Click Yes, again, when prompted about unique lookups.
- To complete the Action section for this condition, click on the Actions button and select Copy List Item.
- Click on the first this list link, choose Current Item, and click OK.
- Click on the second this list link, choose Documents2, and click OK.


Step 6: Save the Workflow and Test It
To save the workflow, click the Finish button at the bottom of the Workflow Designer window. Once it compiles, you're ready to test it.
- Return to the Documents library in your browser and upload a document--for the Comments, just enter "Original Comments".
- Go to the Documents2 library. You should see a copy of your document there, along with the comments you entered.
- Return to the Documents library and choose Edit Properties for the document. Change the Comments to "Second Comments", and click OK.
- Return to the Documents2 library and you will see that the comments have updated there.
- Check your email. You should have received an email notification about the changes that included both the previous and current comments.

I realize that this isn't a "perfect" solution. But it does show some of the power of creating workflows with SharePoint Designer. The problems that I see with it initially are:
- It doesn't handle documents that have been deleted from the Documents library. If you delete a document there, the copy will remain in Documents2. SharePoint Designer workflows can only start manually, when something is created, or when something us updated. I currently don't see a way to start something when it is deleted because the workflow is attached to the item.
- There is no good way to keep users from manually making changes to items in Documents2. When the workflow performs its actions, it does so using the permission of the person that did the action that initiated it. If the user has permissions to Document2, then it is hard to hide it from them.
- It doesn't handle the case where the name of a document is changed. It would be possible to allow for this using some other unique identifier besides the document name though, perhaps something in another custom field.
- It doesn't handle the case where a document with the same name as an existing document is uploaded.
No comments:
Post a Comment